Showing posts with label Tutorial. Show all posts

Wednesday, January 23, 2013

Non-Destructive Cut-Outs

Hi everyone. Today I wanted to share with you a tutorial for how to create non-destructive cut out shapes on a background paper using clipping masks and the Inner Shadow layer style. I know it sounds a little intimidating, but it really is fairly easy once you get the hang of it.

This was a post I wrote for the One Little Bird blog. There is an awesome video tutorial, some tips, and a free action from One Little Bird Designs to help you along.

Read about it here.

Here is the layout I made


Materials: Big Ideas by One Little Bird. Font is Apple Symbols.

Monday, January 21, 2013

How to Create a Signature

Have you noticed in forums or e-mails how people have created cool signature graphics?  Just the other day I decided that it was time to go and update some of mine.  Let me walk you through the process I used.

*The first trick (and what stumps many people before they even begin) is what size to make it.  There are many ways to do it, but let me share with you my favorite.
-Find a signature that is about the size you like and right click on it and choose "Copy Image."
-In PSE (or your editing program), go to "File - New - Blank File." PSE is cool in that it will assume that you want a new document the size of what you just copied.  The one I copied had the following dimensions: 400 pixels wide, 109 pixels high, 72 pixels per inch.  So I just click "OK."  I don't even have to paste the image because I was only copying it for the size.  If this doesn't work for you you can just create a document about this size.
-Then I go to "Image - Resize Image" and get this box:
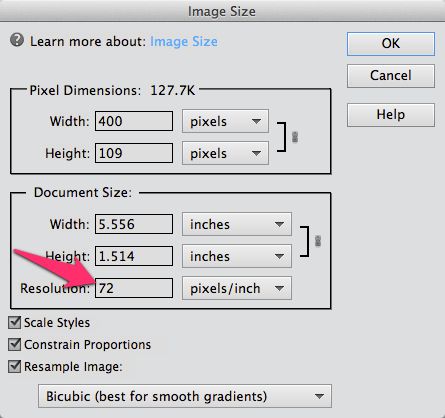


In the box in the center you see that it has width and height in inches and then a resolution box in pixels per inch.  72 pixels per inch is standard for things on the web.  I click in that box and change it to 300 pixels per inch.  It keeps the inches the same but largely increases the pixel width in the top box.  Click "OK."
-Now I have a document that I can work with to create the signature.  The reason I resize it bigger is that I can now use more graphics without having them be so overly large and I can still zoom and adjust things without it getting too blurry.  It also lets me have more flexibility with adding and adjusting  shadows using the presets in PSE.

*The second step is to create the signature.  If you are using digital scrapbooking supplies you will notice that my signature document is still on the small size for some of the graphics so they look super large when put on the page.  There are a couple of ways to get around this.  You could resize your graphic to  something bigger like 600 pixels per inch.  Instead you can resize the graphics smaller either before or after adding them to your signature.

*Once you get the graphic complete you need to resize it small again.  My favorite method is to flatten the image first.  The go back to "Image - Resize Image" and change the 300 back to 72 pixels per inch. Then I also like to sharpen the graphic a bit.

*Next you need to upload your signature to a graphics hosting site like photobucket.

*Finally you need to add your signature where you want.  Most forums have what is called a User CP or some type of settings area.  There you will find a link to "Edit Signature."  Just like in the forums you can often use the picture graphic to add an image to your signature area.  I will work on a tutorial for this soon.

Here are some of the signatures I created last week:

Using Once Upon a Christmas: Believing by Kristin Cronin-Barrow:


Using The Little Things by WM[squared]:
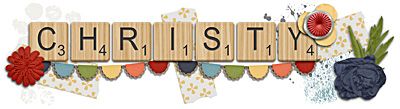

Using Small things by Juno Designs:


Friday, January 18, 2013

Scrapbooking with Evernote

We have been addicted to Evernote in this house.  I'm using it to keep track of recipes, write down project ideas for my kids, writing to do lists, and now tracking some scrapbooking inspiration.  Check it out!


To read a little bit more about it, read my post on KristinCB's blog!

Monday, January 14, 2013

Facebook Timeline Cover Image

Ever wanted to create and upload your own Timeline cover picture?  Here is a video I put together for KristinCB's blog:


Thursday, November 15, 2012

Hue/Saturation Adjustment Layer

Boy, doesn't that sound intimidating: "Hue/Saturation Adjustment Layer!"  I used to be a bit nervous when people talked about adjustment layers, but it turns out, they are very simple in PSE.  In fact, I found out I was using them without even realizing it.  Would you like to learn?

I wrote a blog post on it with an easy to follow video tutorial on using a hue/saturation adjustment layer to change the color of an alpha for your scrapbooking needs.  It is on KristinCB's blog and I used this fabulous Paintwashed Alpha that she has in her store.


Enjoy!

Monday, September 10, 2012

Warping shadows in PSE

One of the challenges at ScrapOrchard this week is about warping shadows.  AND they have a fabulous tutorial for PSE users.  The trick for PSE users is that you have to create a shadow on a separate layer which takes a few extra steps, but then it is easy to stretch the shadow around and get it to look like parts of elements are lifting further off the paper than others.

Let me show you what I mean.  Here is the layout I did for the challenge:


Can you see the string at the bottom of the layout?  I stretched or warped the shadow at the tips to make it look like they float above the page higher than the parts of the string that tuck under the photo.  This really helps it look more realistic.  I also warped the kite string and the butterfly shadow.  On the butterfly you can really see it - the left wing looks bent up a bit higher than the right.

Oh, and I loved how the layout turned out.  They are some of my favorite pictures from last spring and I used this great kit by WM[squared]:


If you would like to try this out or play along with the challenge at ScrapOrchard, here is the great tutorial I mentioned:
http://scraporchard.com/forum/showthread.php/20732-Warping-Drop-Shadows-in-PSE