*The first trick (and what stumps many people before they even begin) is what size to make it. There are many ways to do it, but let me share with you my favorite.
-Find a signature that is about the size you like and right click on it and choose "Copy Image."
-In PSE (or your editing program), go to "File - New - Blank File." PSE is cool in that it will assume that you want a new document the size of what you just copied. The one I copied had the following dimensions: 400 pixels wide, 109 pixels high, 72 pixels per inch. So I just click "OK." I don't even have to paste the image because I was only copying it for the size. If this doesn't work for you you can just create a document about this size.
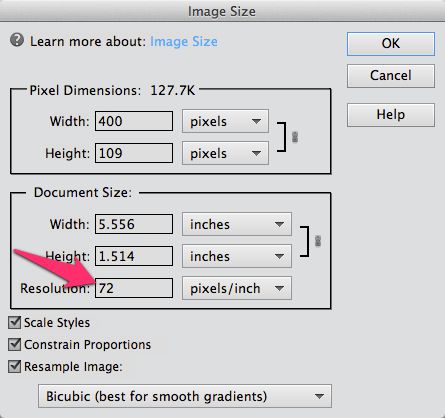
-Then I go to "Image - Resize Image" and get this box:

In the box in the center you see that it has width and height in inches and then a resolution box in pixels per inch. 72 pixels per inch is standard for things on the web. I click in that box and change it to 300 pixels per inch. It keeps the inches the same but largely increases the pixel width in the top box. Click "OK."
-Now I have a document that I can work with to create the signature. The reason I resize it bigger is that I can now use more graphics without having them be so overly large and I can still zoom and adjust things without it getting too blurry. It also lets me have more flexibility with adding and adjusting shadows using the presets in PSE.
*The second step is to create the signature. If you are using digital scrapbooking supplies you will notice that my signature document is still on the small size for some of the graphics so they look super large when put on the page. There are a couple of ways to get around this. You could resize your graphic to something bigger like 600 pixels per inch. Instead you can resize the graphics smaller either before or after adding them to your signature.
*Once you get the graphic complete you need to resize it small again. My favorite method is to flatten the image first. The go back to "Image - Resize Image" and change the 300 back to 72 pixels per inch. Then I also like to sharpen the graphic a bit.
*Next you need to upload your signature to a graphics hosting site like photobucket.
*Finally you need to add your signature where you want. Most forums have what is called a User CP or some type of settings area. There you will find a link to "Edit Signature." Just like in the forums you can often use the picture graphic to add an image to your signature area. I will work on a tutorial for this soon.
Here are some of the signatures I created last week:
Using Once Upon a Christmas: Believing by Kristin Cronin-Barrow:

Using The Little Things by WM[squared]:

Using Small things by Juno Designs:


No comments:
Post a Comment